图集
图集组件用于高效渲染同一纹理或图像的多个实例。它特别适用于绘制大量相似的对象,例如精灵,并具有不同的变换。
它的设计在与Reanimated一起使用时特别有用。
| 名称 | 类型 | 描述 |
|---|---|---|
| image | SkImage 或 null | 图集:包含精灵的图像。 |
| sprites | SkRect[] | 精灵在图集中的位置。 |
| transforms | RSXform[] | 要应用于每个精灵的旋转/缩放变换。 |
| colors? | SkColor[] | 可选。 用于混合精灵的颜色。 |
| blendMode? | BlendMode | 可选。 用于将精灵和颜色组合在一起的混合模式。 |
| sampling? | Sampling | 用于采样图像的方法。 请参阅(采样选项)。 |
RSXform
altas API 使用的 RSXform 对象是以下矩阵的压缩:[fSCos -fSSin fTx, fSSin fSCos fTy, 0, 0, 1]。以下是一些您会发现有用的变换
tsxSkia } from "@shopify/react-native-skia";// 1. Identity (doesn't do anything)letrsxForm =Skia .RSXform (1, 0, 0, 0);// 2. Scale by 2 and translate by (50, 100)rsxForm =Skia .RSXform (2, 0, 50, 100);// 3. Rotate by PI/4, default pivot point is (0,0), translate by (50, 100)constr =Math .PI /4;rsxForm =Skia .RSXform (Math .cos (r ),Math .sin (r ), 50, 100);// 4. Scale by 2, rotate by PI/4 with pivot point (25, 25)rsxForm =Skia .RSXformFromRadians (2,r , 0, 0, 25, 25);// 5. translate by (125, 0), rotate by PI/4 with pivot point (125, 25)rsxForm =Skia .RSXformFromRadians (1,r , 100, 0, 125, 25);
tsxSkia } from "@shopify/react-native-skia";// 1. Identity (doesn't do anything)letrsxForm =Skia .RSXform (1, 0, 0, 0);// 2. Scale by 2 and translate by (50, 100)rsxForm =Skia .RSXform (2, 0, 50, 100);// 3. Rotate by PI/4, default pivot point is (0,0), translate by (50, 100)constr =Math .PI /4;rsxForm =Skia .RSXform (Math .cos (r ),Math .sin (r ), 50, 100);// 4. Scale by 2, rotate by PI/4 with pivot point (25, 25)rsxForm =Skia .RSXformFromRadians (2,r , 0, 0, 25, 25);// 5. translate by (125, 0), rotate by PI/4 with pivot point (125, 25)rsxForm =Skia .RSXformFromRadians (1,r , 100, 0, 125, 25);
Hello World
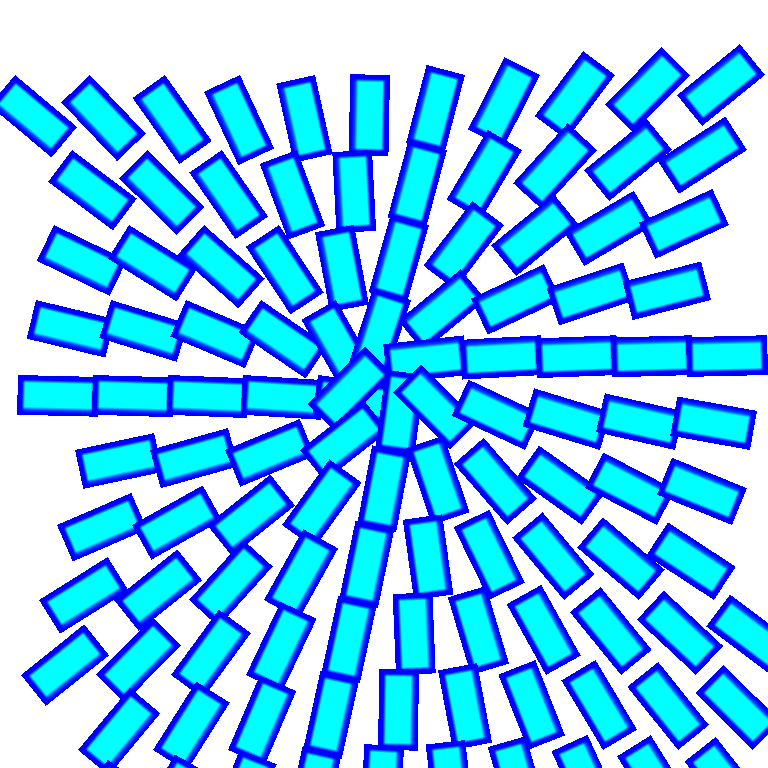
在下面的示例中,我们绘制一个简单的矩形作为图像。然后,我们将该矩形显示 150 次,并对每个矩形应用简单的变换。
tsxSkia ,drawAsImage ,Group ,Rect ,Canvas ,Atlas ,rect } from "@shopify/react-native-skia";constsize = {width : 25,height : 11.25 };conststrokeWidth = 2;constimageSize = {width :size .width +strokeWidth ,height :size .height +strokeWidth ,};constimage =drawAsImage (<Group ><Rect rect ={rect (strokeWidth / 2,strokeWidth / 2,size .width ,size .height )}color ="cyan"/><Rect rect ={rect (strokeWidth / 2,strokeWidth / 2,size .width ,size .height )}color ="blue"style ="stroke"strokeWidth ={strokeWidth }/></Group >,imageSize );export constDemo = () => {constnumberOfBoxes = 150;constpos = {x : 128,y : 128 };constwidth = 256;constsprites = newArray (numberOfBoxes ).fill (0).map (() =>rect (0, 0,imageSize .width ,imageSize .height ));consttransforms = newArray (numberOfBoxes ).fill (0).map ((_ ,i ) => {consttx = 5 + ((i *size .width ) %width );constty = 25 +Math .floor (i / (width /size .width )) *size .width ;constr =Math .atan2 (pos .y -ty ,pos .x -tx );returnSkia .RSXform (Math .cos (r ),Math .sin (r ),tx ,ty );});return (<Canvas style ={{flex : 1 }}><Atlas image ={image }sprites ={sprites }transforms ={transforms } /></Canvas >);};
tsxSkia ,drawAsImage ,Group ,Rect ,Canvas ,Atlas ,rect } from "@shopify/react-native-skia";constsize = {width : 25,height : 11.25 };conststrokeWidth = 2;constimageSize = {width :size .width +strokeWidth ,height :size .height +strokeWidth ,};constimage =drawAsImage (<Group ><Rect rect ={rect (strokeWidth / 2,strokeWidth / 2,size .width ,size .height )}color ="cyan"/><Rect rect ={rect (strokeWidth / 2,strokeWidth / 2,size .width ,size .height )}color ="blue"style ="stroke"strokeWidth ={strokeWidth }/></Group >,imageSize );export constDemo = () => {constnumberOfBoxes = 150;constpos = {x : 128,y : 128 };constwidth = 256;constsprites = newArray (numberOfBoxes ).fill (0).map (() =>rect (0, 0,imageSize .width ,imageSize .height ));consttransforms = newArray (numberOfBoxes ).fill (0).map ((_ ,i ) => {consttx = 5 + ((i *size .width ) %width );constty = 25 +Math .floor (i / (width /size .width )) *size .width ;constr =Math .atan2 (pos .y -ty ,pos .x -tx );returnSkia .RSXform (Math .cos (r ),Math .sin (r ),tx ,ty );});return (<Canvas style ={{flex : 1 }}><Atlas image ={image }sprites ={sprites }transforms ={transforms } /></Canvas >);};
动画
图集组件通常应与 Reanimated 一起使用。首先,useTexture 钩子将使您可以直接在 UI 线程上创建纹理,而无需进行任何复制。其次,我们为您提供诸如 useRectBuffer 和 useRSXformBuffer 等钩子,以有效地对精灵和变换进行动画处理。
下面的示例与上面的示例相同,但是位置是绑定到手势的动画值。
tsxSkia ,drawAsImage ,Group ,Rect ,Canvas ,Atlas ,rect ,useTexture ,useRSXformBuffer } from "@shopify/react-native-skia";import {useSharedValue ,useDerivedValue } from "react-native-reanimated";import {GestureDetector ,Gesture } from "react-native-gesture-handler";constsize = {width : 25,height : 11.25 };conststrokeWidth = 2;consttextureSize = {width :size .width +strokeWidth ,height :size .height +strokeWidth ,};export constDemo = () => {constpos =useSharedValue ({x : 0,y : 0 });consttexture =useTexture (<Group ><Rect rect ={rect (strokeWidth / 2,strokeWidth / 2,size .width ,size .height )}color ="cyan"/><Rect rect ={rect (strokeWidth / 2,strokeWidth / 2,size .width ,size .height )}color ="blue"style ="stroke"strokeWidth ={strokeWidth }/></Group >,textureSize );constgesture =Gesture .Pan ().onChange ((e ) => (pos .value =e ));constnumberOfBoxes = 150;constwidth = 256;constsprites = newArray (numberOfBoxes ).fill (0).map (() =>rect (0, 0,textureSize .width ,textureSize .height ));consttransforms =useRSXformBuffer (numberOfBoxes , (val ,i ) => {"worklet";consttx = 5 + ((i *size .width ) %width );constty = 25 +Math .floor (i / (width /size .width )) *size .width ;constr =Math .atan2 (pos .value .y -ty ,pos .value .x -tx );val .set (Math .cos (r ),Math .sin (r ),tx ,ty );});return (<GestureDetector gesture ={gesture }><Canvas style ={{flex : 1 }}><Atlas image ={texture }sprites ={sprites }transforms ={transforms } /></Canvas ></GestureDetector >);};
tsxSkia ,drawAsImage ,Group ,Rect ,Canvas ,Atlas ,rect ,useTexture ,useRSXformBuffer } from "@shopify/react-native-skia";import {useSharedValue ,useDerivedValue } from "react-native-reanimated";import {GestureDetector ,Gesture } from "react-native-gesture-handler";constsize = {width : 25,height : 11.25 };conststrokeWidth = 2;consttextureSize = {width :size .width +strokeWidth ,height :size .height +strokeWidth ,};export constDemo = () => {constpos =useSharedValue ({x : 0,y : 0 });consttexture =useTexture (<Group ><Rect rect ={rect (strokeWidth / 2,strokeWidth / 2,size .width ,size .height )}color ="cyan"/><Rect rect ={rect (strokeWidth / 2,strokeWidth / 2,size .width ,size .height )}color ="blue"style ="stroke"strokeWidth ={strokeWidth }/></Group >,textureSize );constgesture =Gesture .Pan ().onChange ((e ) => (pos .value =e ));constnumberOfBoxes = 150;constwidth = 256;constsprites = newArray (numberOfBoxes ).fill (0).map (() =>rect (0, 0,textureSize .width ,textureSize .height ));consttransforms =useRSXformBuffer (numberOfBoxes , (val ,i ) => {"worklet";consttx = 5 + ((i *size .width ) %width );constty = 25 +Math .floor (i / (width /size .width )) *size .width ;constr =Math .atan2 (pos .value .y -ty ,pos .value .x -tx );val .set (Math .cos (r ),Math .sin (r ),tx ,ty );});return (<GestureDetector gesture ={gesture }><Canvas style ={{flex : 1 }}><Atlas image ={texture }sprites ={sprites }transforms ={transforms } /></Canvas ></GestureDetector >);};